Nails! The bane of my existence!
I used to get my nails Shellac-ed all the time, which I loved because my nail colour would last for weeks, and my nails would look in pretty darn good shape.
Nowadays, time seems like a luxury I just can’t afford.
So for the past couple of weeks, I’ve been paying real close attention to the condition of my nails and it’s really paying off in terms of far prettier at-home-nail-jobs, healthier nails and longer lasting polish.
Best part, it isn’t as hard as you think!
You will need to invest in a few essential tools to prep your nails for the perfect paint job.
Before you apply your nail colour, spend a little time getting your nails in tip top shape.
- Make sure your nails are completely clean and free of any oils. Even if you’ve just removed your previous colour, use a little nail scrubbing brush to scrub off any excess oils.
- Next, dry your nails completely.
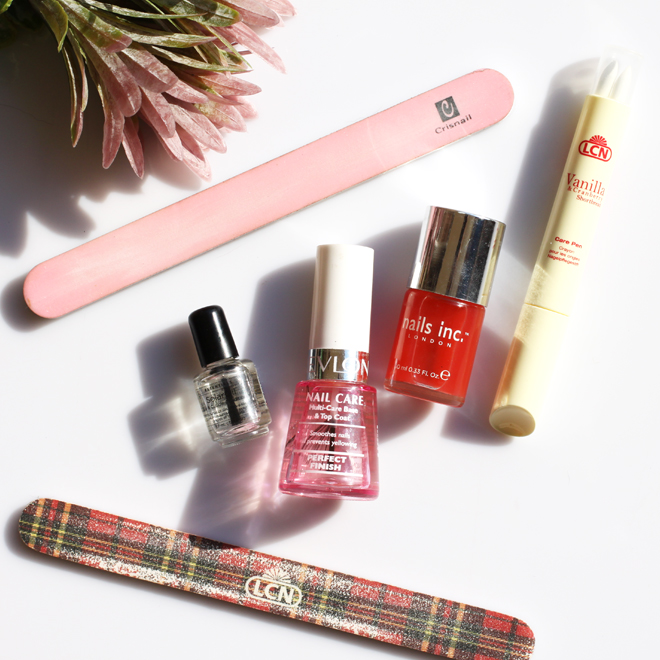
- Shape your nails using a nail file, going in one direction rather than sawing back and forth. Gals, you get nail files and then you get nail files! Those cheapies you find in the supermarket are often the wrong kind! Rough files can do more harm than good, so invest in a quality one that’s made for nails. I love the LCN nail files, I’ve had mine for ages, and as you can tell, I need to replace it soon 🙂
- Dust off your nails or give them another scrub and dry completely.
- Show your cuticles some love! Instead of using those nasty wooden cuticle sticks, I prefer to use Nail Care Pens from LCN. They offer intensive care for your cuticles (with three replaceable heads at the back of the pen) and this one, the Vanilla and Cranberry Shortbread smells amazing.
- Now it’s time to buff! Although buffing your nail is frowned upon, especially if you use a traditional nail file (no-no!), sometimes the tips of your nails peel due to dryness, and you need to smooth out those rough edges or your nail polish will chip off. Think of light buffing as exfoliation for your nails. I use my Crisnail Buffer and Shiner which is amazing! First, using the pink side, which is extremely fine, I lightly buff the top ends of my nails, going in small round movements. Then, using the white side, I shine them, going back and forth and round and round. The beauty of this product is that it buffs the nails to an instant shine quickly and easily without the risk of damaging the nail bed. Once my nails are smooth, they’re ready for paint!
- Before applying nail colour, if you want your polish to last, use a base coat. I used to skip this step so often, but it really has made a big difference, both in terms of applying nail polish more accurately, and “protecting” my nails by avoiding any nasty yellowing. My current fave is Nails inc Caviar Basecoat.
- Allow your base coat to dry completely before applying your nail colour. Check out this post for my five easy and simple tips that will allow you to paint your nails like a pro!
- After you’ve applied your nail color and let it dry completely, it’s time for Top Coat. My current fave is Revlon Perfect Finish Multi-Care Base & Top Coat.
- After my nails are completely dry, I apply CND Solar Oil, which is an amazing cuticle care product! It’s infused with jojoba oil and vitamin E to nourish your cuticles. I use it all the time, at least 2-3 times a week and with regular use it helps drives nutrients in deeper, creating stronger, healthier nails and a hydrated cuticle area.
If you have any nail care tips to share, I’d love to hear them. Comment below and let me know what else I need for perfect, healthy and happy nails.
Where to find:
- LCN: www.lcn.co.za
- CND & Crisnail: www.exclusivebeauty.co.za
- Nails Inc: Available at selected Edgars nationwide
- Revlon: Available at leading retailers or click here for a stockists list

The nail inc nail polish looks so pretty!
CANDICE | BEAUTY CANDY LOVES
It’s not a nail polish Candice, it’s base coat (so it’s clear), but the bottle is very orangey. It would’ve made a great colour though 🙂
Ah sorry yeah the bottle is looks so cool though it would make a gorgeous colour!!
I don’t have any tips to share as this is a very informative post – doing my nails tonight and need to buff and file some ridges. Thank you.