Want to know how to cultivate your very own Wild Yeast Starter? Make your Yoghurt last for ever? Or even hand churn your own butter? We’ll you’ve come to the right place.
I’ve been spending a helluva lot of time in my kitchen these days, and I ain’t gonna lie, I kinda like it. Besides organizing like crazy (my cupboards have never looked more calming to open, and my pantry organization makes me want to skip), but I’ve actually really enjoyed cooking during the lockdown period. It’s like I went to sleep on the 26th March and woke up a Greek woman the next day – ready to feed my army, with passion and pride (insert muscle flexing emoji). Even though, my army technically consists of the hubby and me (and the doggies of course) but, I am enjoying the whole cooking and making and creating process these days.
One thing lockdown cooking has taught me, is that you don’t have to be stuck waiting for commercially sold food products to become available, when you can make so many things yourself at home, with just a few ingredients.
Before you freak out, know this; I’m not one for complications – especially when it comes to cooking. And so “making my own ingredients” shouldn’t be something that makes me want to rip my hair out. Luckily, all three suggestions I have for you below will ensure your precious locks stay in place.
Are you ready?

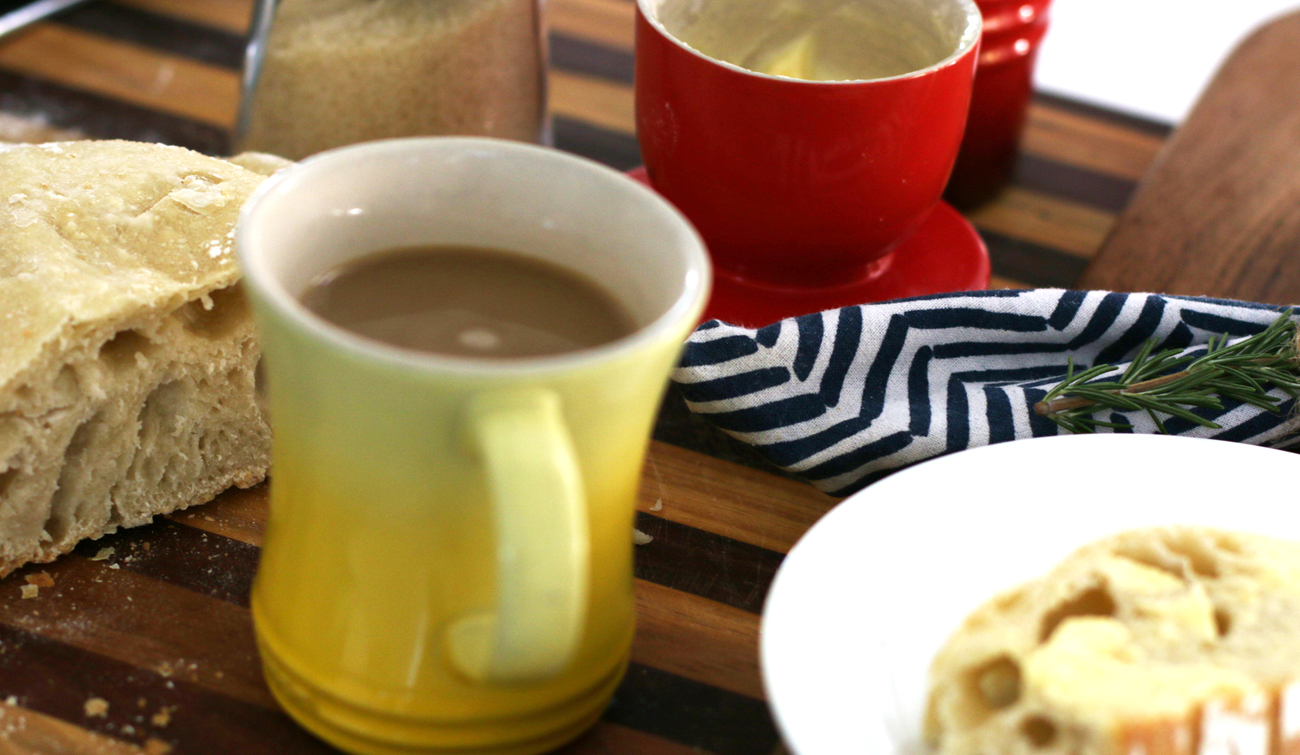
All homemade: My first Sourdough bread using my Cultivated Wild Yeast Starter, slathered with my hand churned butter and French pressed coffee with a dash of left over Buttermilk. Breakfast (and lunch) of champions!
Cultivate your Own; Wild Yeast Starter
All you need is = Flour + Distilled (Filtered or Purified) Water
I never knew one could make their own yeast. I learnt very quickly though, since I had tried to get my hands on yeast at least a month before lockdown and during the lockdown period and everyone was sold out. Yeast was like friggin gold and I had this drive to become friends with my oven, so it was so annoying not being able to get yeast.
Nonetheless, I made my own Wild Yeast Starter and even tried it out in a Sourdough bread and it was yumma-yummy! Now I have my own Wild Yeast growing in my kitchen, ready for making bread. I’ve also learnt during this process that patience is key! Especially when it comes to making bread (and yeast), but it’s a learning process with great rewards. I’m still very much in the learning phase, and have so far, made one perfect sweet bread, one perfect sourdough bread, one colossal flop of a French Baguette and then a success on the second try with a few modifications. So basically, what I’m saying is that you may not win them all (and if you do, please let me in on your secret !), but either way you will learn something new.
Now back to the Wild Yeast Starter.
I watched this how to video first and thank goodness I did because it worked out perfectly. I stumbled upon a few others after watching this one, and they were so complicated that they would have put me off wanting to start my own Yeast Starter, for sure! So, do yourself a favor, and watch this video by The King’s Roost. I got my starter going in about six days and I didn’t have pineapple juice, so I started mine with Purified Water and Cake Flour.

Now, once you get your starter going, there is a brilliant Sourdough Bread Recipe here (this is the one I used) and an excellent Sourdough Bread video you can watch to learn more about making artisan bread. Trust me, when you get the first one (as basic as it is) going, you’ll wan’t to put on your apron, play French Cafe music and sprinkle flour all over your kitchen to become an Artisan bread baker. My advice, is don’t follow over complicated videos, they will just put you off and frustrate the living you-know-what out of you! I thought I’d get fancy, and follow a super Artisan baker’s video on how to make a French Baguette and guess what – FLOP!
Make your Own Yoghurt
All you need is = Yoghurt + Milk
A friend of mine swears by making her own yogurt at home. Apart from milking your own cows, there is a way to make your own yoghurt at home – or rather, make your yoghurt supply stretch out for, well, for ever if you want.
For this, you’ll need to have some yoghurt on hand. But I mean, like two tablespoons, so the best time to try this is when your yoghurt supply runs low, and instead of dashing to the shops, you can stretch your supply. You can also purchase Yoghurt Starter Culture Kits which you can use with milk to make yoghurt from scratch. I bought one of these from Faithful To Nature, and it’s currently sitting in my freezer. I got this as a back-up plan for if my yoghurt from yoghurt attempt didn’t work, but it worked perfectly. So, while these starter cultures are great, they are not really necessary, unless, yoghurt becomes a scarcity like yeast – you never know in this jumble of time right now.
Again, this is not something I’ve come up with, so I will rather share the good advice that actually works on this subject since I tried two attempts and the first one failed. P.S You’re welcome for having me as your Guinea pig 🙂
I followed this video for my yoghurt and it worked wonders! I used fresh, full fat milk and low fat, plain yoghurt (even though the video suggested using full fat yoghurt – I just didn’t have).
I warmed up the milk in my Le Creuset Buffet Casserole, waited for it to get to the right temperate, took it off the stove and let it cool as suggested before adding my two tablespoons of yoghurt. Then I covered it, stuck it in the oven with the light on overnight, and the next day – ta-dah! Yoghurt!
My mom suggested that I strain it to make my Yoghurt Greek. So, the next morning, instead of chilling it in the fridge (as the video suggests), I strained mine in a Nut Bag for about two hours, then when the Whey dripped out, I emptied the contents of the nut bag into a glass Consol jar and left that in the fridge to set. It tasted so good, so I am sure I did it right – haha. Although it wasn’t as thick as I expected – maybe becuase I used low fat yoghurt, or maybe because I strained it first before setting it, I don’t know. Maybe my expectations were set too high and I was hoping to taste the real Greek yoghurt, like the ones I’ve had in Greece, but I will figure it out!
What to do with the whey you ask? Well, I hate throwing anything out if it can be used, and apparently you can use whey in place of buttermilk for some recipes. I keep it in a jar and add a little to my dogs breakfasts in the morning and there are plenty happy tails wagging – plus its really good for them (and us too, so don’t discard your whey).
Is it a mission to make your own yoghurt? Not really a mission, but it does take some time and it’s probably easier to just buy yoghurt, but I enjoy making things myself and lets face it, you could probably do this with UHT Long Life Full Cream Milk. Storing UHT milk is easy as it generally has a longer shelf life, so you can stock up, plus it saves a visit to the shop and having to fill your fridge up with yoghurt.
All in all though, I thought my yoghurt tasted much nicer than the store bought one which I used as a starter and I’m looking forward to making more. I just made one litre because I messed up the first one (still drinkable), but I didn’t want to waste milk again until I had perfected the yoghurt making experiment.
Make Your Own Butter
All you need is = Fresh Cream + Mason Jar
Again, the ideal situation would be to have your own dairy cow, but hey, let’s face it, that’s just not an option for most of us! But you can still dabble in a bit of homesteading with a well stocked pantry. The other day I was faced with the no butter dilemma, which really sucked, because I didn’t want to go out for one simple item. Luckily, I had some long life cream stashed away, and with the help of YouTube (bless YT in these trying times), I managed to literally whip up my own butter in a few minutes.
For this, you don’t need any fancy “butter churning” appliances. All you need is a glass mason jar and some, either Fresh Full Cream, or Long Life UHT Full Cream (ya know the one in the box). I used a 500ml Consol jar and x1 250ml carton of UHT Full Cream to whip up a fresh batch of butter and it was so easy.
Now, you probably know that butter can be stored in the freezer too, so you can keep a supply, but if you’re short on freezer space, you can stock up on UHT Full Cream instead and make your own butter from that.
It’s super quick, easy and the best part is you get some buttermilk from the process – which makes an amazing addition to your morning cuppa. Plus, the shake up process gave my triceps a fantastic workout – and let’s face it, with the amount of time I’m spending in the kitchen these days, I’m going to need to burn a lot of calories.
So there you go my friends, easy peasy homesteading that makes you really appreciate the process of creating food.
Let me know if you tried any of these recipes and how your creations turn out.
P.S I’ve also received a ton of questions about my pizza dough recipe, which I will share with you real soon.
Stay safe!
