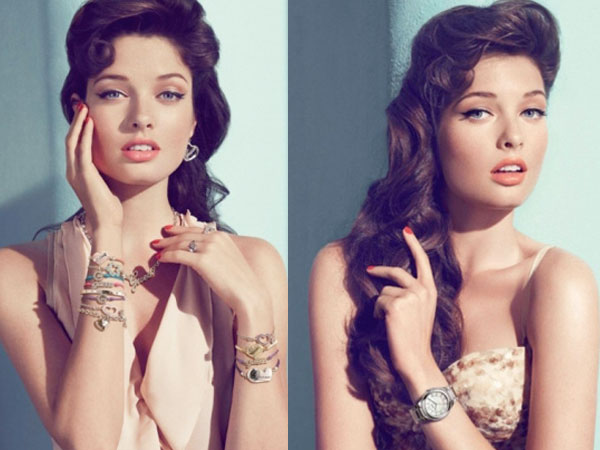
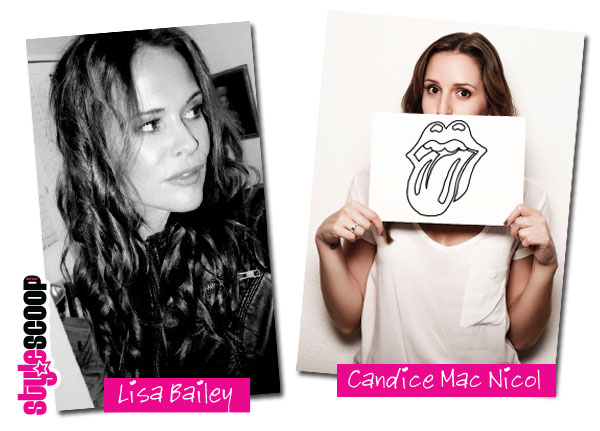
I am head-over-heels in love with the latest Guess Accessories campaign! The makeup is to-die-for and I can’t wait to try this look out, so I asked two of my favourite Durban based makeup artists, Candice Mac Nicol (@cands_mac) and Lisa Bailey (@LisaBaileyPout) to give me their tips, tricks and product recommendations on how to get this glam old-Hollywood look!
ON THE FACE
Candice’s Tips
Allow your natural skin and glow to shine through! The foundation is light and well-matched to the skin tone, allowing a natural glow. Using a wet cosmetic sponge, wet Beauty Blender or wet Stippling brush, apply a light to medium coverage liquid foundation on the face. Great products to use include MAC Face & Body or Chanel Vitalumiere Aqua.
Apply concealer only where needed (under eyes, around base of nose, any red areas). This type of look requires a natural skin tone and the final look shouldn’t be too heavy or matte. Great products to use include Bobbi Brown concealer, Clinique eye concealer or Smashbox HD concealer. If you’d like, apply a highlighting concealer under the eyes like YSL Touche Eclat. Use a flat, synthetic brush and your ring finger.
Contour & Highlight using a matte contour powder two shades darker than your natural skin tone, gently contour from just below your temple, under the cheekbone and blend out. Remember this is meant to look like a natural shadow so you shouldn’t see any defined lines or Jersey Shore contours. Also, every contour differs according to the face shape so keep in mind where you should be contouring. Inglot eye-shadows are great for this if you can find the correct matte shade. Use a soft blush or powder brush to apply.
You can use a shimmery “frosty” coloured eye shadow or a cream highlight on the top of the cheekbone to emphasize the cheeks. This same highlight can be added to inner corner of the eyes and the bow of the lip. If you want to make your bottom lip appear fuller, add a little highlight to the middle of the lip before lipstick or lip liner. Use your ring finger to apply and blend out the highlighter. Great products include; MAC cream highlighters, Benefit Girl Meets Pearl, Inglot eyeshadow in the right shade.
Lisa’s Tips
Before starting this look, make sure your face is prepped; exfoliated, moisturized and that your brows are neatly plucked. Foundation is key! To create a flawless finish apply Chanel’s Vitalumiere – which is a moisture-rich radiance fluid foundation and apply using a wedge sponge. Don’t get too close to the brow or hairline – rather use your fingers to blend foundation further into these areas. Make sure you blend foundation around the jawline into the neck area. For dark ethnic skin tones use MAC Studiofix Fluid foundation.
Conceal eyes and red areas with either a matching MAC, Bobbi Brown or Chanel concealer – blending gently into the surrounding foundation area. Clear any crease lines around the eyes using you finger and apply a translucent powder using a powder brush to set foundation in place. Remember to powder upper and lower eye area, but keeping the powder away from your lash and brow hair area. My powder of choice would be MAC blot powder. Don’t apply too much powder, especially to the nose – we don’t want the “caked look”!
Sweep a layer of MAC “Cubic” blush down the cheekbone area – adding a touch more to the apples of the cheek. For darker skin tones, apply MAC “Raisin” blush or contour cheeks with a darker concealer for definition.
ON THE EYES
Candice’s Tips
Using the same powder from contouring, shape the socket of your eye and blend it out and up just a little. Again take care to note the shape of your eyes and what shape works best for you. Apply a pearl or golden shimmer over the eye lid. Use MAC “Indianwood” pot paint for darker skin tones and Estee Lauder ShadowCreme in “Pink Blush” for lighter skin tones.
Line your eyes with a black liner, or brown-black for a more subtle look. The line must start thinner at the inner corner and get thicker towards to the outer corner of the eye. A sneaky tip to create the “wing” is to use sticky tape at an angle between the outer corner of the bottom lash line and the end of the eyebrow. Use a sharpened eye pencil (MAC “graph black”), liner gel with a small angled brush (Inglot Cream Liners & MAC 266 brush) or a Liner pen (Smashbox eye pen).
Apply lots of black mascara (after curling lashes) and remember to pull the lashes up and outwards to emphasize the almond shape of the eyes. I love Maybelline Colossal Mascara, Chanel Inimitable Mascara and Dior Show Mascara
If you feel that the bottom lashes need some attention, use a brown mascara lightly for more definition – but remember that this will close the eyes and make them appear smaller. No eye liner on the bottom lashes.
Fill in your eyebrows using a pencil or matte powder. Don’t change the shape too much or over fill them, just add some subtle definition. Benefit Brow Zings is an amazing little kit!
Lisa’s Tips
Apply a gentle amount of MAC “Cork” eyeshadow to the eye socket (concave above the lid) using a MAC 217 brush or Smashbox No.15 blending brush. Remember to blow on your brush to remove any excess shadow from falling onto your lower eye area. Add a touch of Cork shadow under the lower lashes using your MAC 266 angle brush or MAC 219 smudge brush.
Sweep a layer of Chanel’s Ombré D’eau iridescent liquid shadow in colour “Source 40” or their long lasting Illusion D’Ombre in “Emerveille” and blend over lid to just meet the socket area. These shadows are a quick and easy alternative to powder eyeshadow. This formula glides on for a long-lasting, lightweight veil of shimmering colour. Bi-phase liquid powder shakes to combine for subtle-to-intense shading, with stay-fresh, crease-resistant results. Apply MAC’s “Trace Gold” Blush to Ethnic lids.
Use MAC paint pot in “Blacktrack” and a small MAC angle brush to create your line by dipping your angle brush into the paint pot – smoothing each side of your brush on the tip of the jar to align your bristles before dragging your brush from outer corner inwards. Remember, long tip facing outwards to create a sharp point. The line must taper inwards as it reaches the inner corner of the eye. Turn your brush so that the long tip of brush points to the inner corner to achieve this.
Smooth a layer of MAC “Carbon Black” eyeshadow over your line to hide any flaws and to finish it off. Make sure your angle brush is clean and dry before using the powder eyeshadow.
Curl your lashes using a MAC eyelash curler and apply a generous amount of MAC “Boldest Black” Studiofix mascara to your top lashes – directing it outwards in the direction of your liner flick. You can also apply MAC No.7 lashes using Duo glue. After the glue had dried, touch up your line using your paint po or carbon shadow. Remember to apply mascara to your own lashes before applying the false lashes.
Lastly, define your brows using MAC’s eyebrow pencil in “Lingering” for lighter brows or “Stud” for darker brows. Gently fil in some hairline gaps with a feathering motion – keeping it natural and carefully defining the eyebrow arch. To set your brows, comb through using clear eyebrow gel from MAC whihc will set the shape in place.
ON THE LIPS
Candice’s Tips
Use a nude lip liner to shape and fill in your lips (no one has a perfect lip shape and I always cheat the lips a little). Apply a light/sheer nude lipstick with a slight pink undertone (again, this is all about finding the right shade for you). If you’ve highlighted under the lipliner, you shouldn’t need to apply a fussy lipgloss.
Lisa’s Tips
Stain lips by applying MAC “Mocha” lipstick using your finger. Powder over and reapply. Make sure lips are slightly concealed and powdered before starting this. For ethnic lips try MAC’s “Chestnut” liner to define and deepen the shade, then apply “Mocha” lipstick inside blending it into the liner.
ABOUT THE ARTISTS
[toggle title=”About Lisa Bailey”] Lisa Bailey is the founder of Pout Make-up School. Trained in London at the internationally renowned Glauca Rossi School of Make-up in 1998, Lisa was introduced to the fashion industry while working as a model, and quickly discovered a passion for the art of make-up. Since then, Lisa has been working independently at the forefront of the fashion industry both locally and abroad.
Lisa’s work has been seen on the cover’s and pages of magazines such as GQ, FHM, Sports Illustrated, Glamour, Elle, Norwegian Elle, Marie Claire, Cosmo, Gli, The Face and Dazed and Confused. Lisa has collaborated with some of the most respected photographers, celebs and models in the industry – working on numerous international and local fashion shows, catalogues and campaigns.
Indisputably one of Durbans leading make-up artists, Lisa continues to work in the industry alongside teaching, thereby staying abreast of all the latest looks and trends and providing her students with invaluable hands-on experience and insight into this exciting industry. Lisa has trained up some of the leading make-up artists in the industry today and will continue to do so into the future.
See her portfolio on www.poutschoolofmakeup.com and www.lisabailey.co.za
Email her: lisabailey@mweb.co.za and follow her on Twitter: @LisaBaileyPout
 Makeup artist Candice Mac Nicol has worked extensively in the photographic, fashion, film, wedding and commercial fields, as well as offering her services as a makeup artist to celebrities.
With a background in marketing, production and art direction, Candice offers a professional and reliable service, with a skill quality that is reflected in all her work.
See her portfolio at www.playplaycreations.com, visit her blog or Tumblr.
Follow Candice on Twitter: @cands_mac, check out her Youtube Channel or follow her Pins on Pinterest
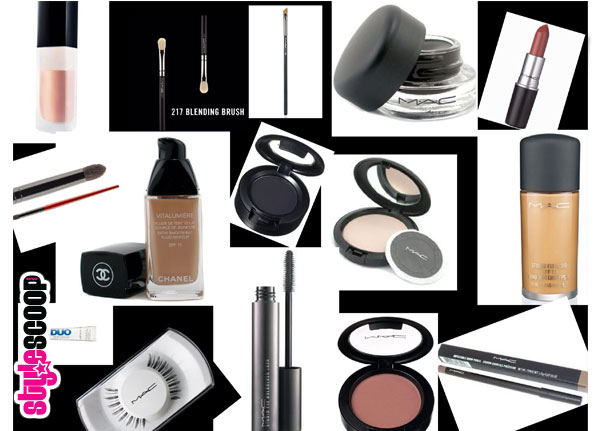
Thanks Lisa for this gorgeous MoodBoard!

Thanks so much! It’s been great working with you and I look forward to the next tutorial 🙂